

Your Garmin just flashed 11.8 cm for vertical oscillation.
That puts you above the 6–9 cm target range for most training paces, and it has a measurable effect on how much energy each stride wastes.
Vertical oscillation measures how much your torso moves up and down with every stride. Efficient runners keep this relatively low because they’re converting muscular effort into forward motion, not vertical bounce.
Understanding your range, and why it matters, is the first step to running more efficiently at the same effort level.
In this article, you’ll learn:
- What vertical oscillation is and how it’s measured
- What the research-backed target range looks like at different paces
- What vertical ratio is and why your Garmin shows both metrics
- What happens when your oscillation is too high or too low
- Five form adjustments that directly reduce excessive vertical movement
What Is Vertical Oscillation in Running?
Vertical oscillation measures how much your center of mass moves up and down with each running stride, recorded in centimeters. Every stride includes a brief flight phase where both feet leave the ground.
The total vertical travel through this up-down cycle is your vertical oscillation reading.
Efficient runners minimize unnecessary vertical movement because most of their power is directed forward, not upward.
A runner with good oscillation has a noticeably steady head level when viewed from behind, with the upper body staying level while the legs do the work underneath.
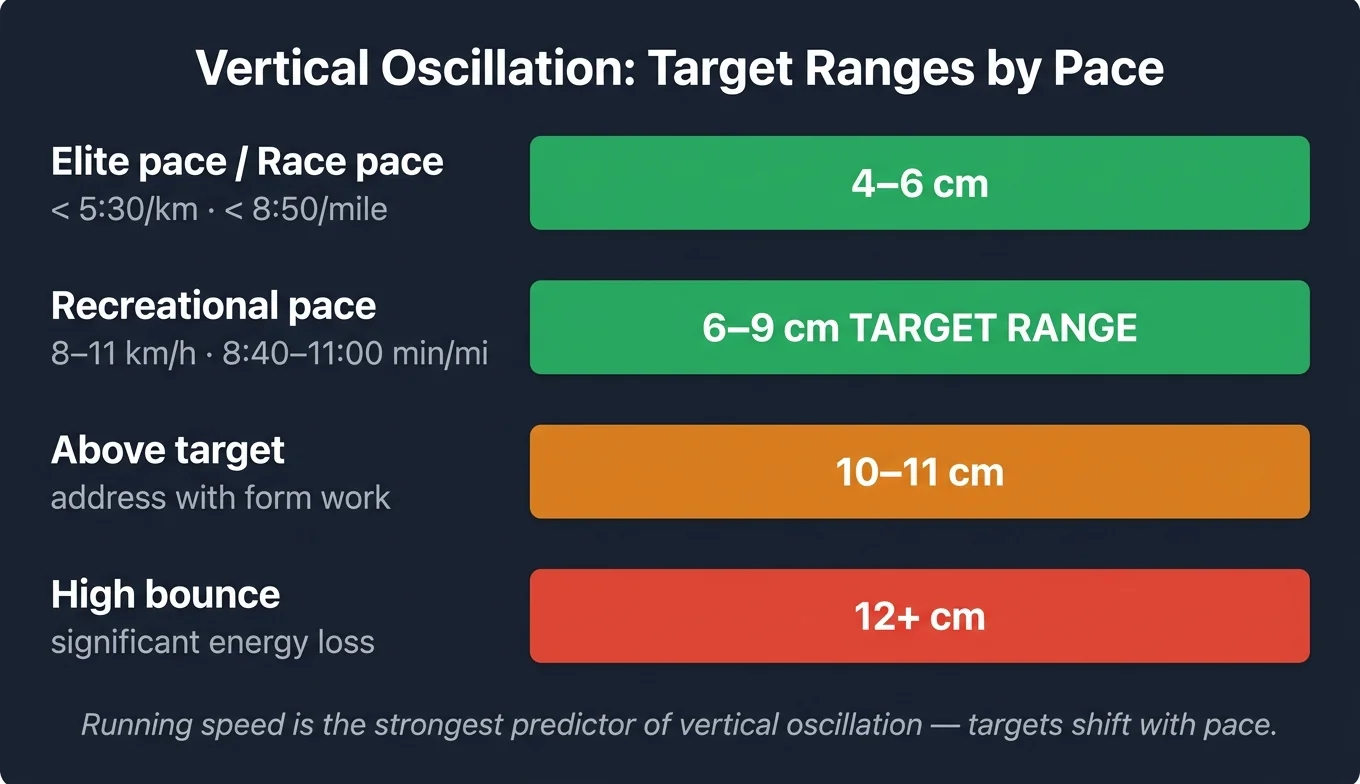
What Is a Good Vertical Oscillation Range?
A good vertical oscillation range for most runners is roughly 6–9 cm at recreational running paces (8–11 km/h, or roughly 8:40–11:00 min/mile pace).
A 2023 study of 860 non-elite runners found that running speed was the strongest predictor of vertical oscillation, confirming that the appropriate target range shifts with pace rather than following a single universal number that applies to everyone.

As pace increases, vertical oscillation tends to decrease naturally because faster strides are shorter and more compact.
Elite runners at race pace often measure 4–6 cm.
Most runners at conversational pace commonly land between 8–11 cm.
The older 5–10 cm range cited in earlier research was accurate but too broad to be actionable.
A more useful benchmark: if you’re running at easy pace and measuring above 10 cm, that’s a clear target for improvement.
Improving your running economy and reducing vertical oscillation often happen together. Both reflect the same underlying efficiency in how your body converts effort into forward movement.
RunnersConnect Bonus
Download your FREE Hip Strengthening Exercises Guide.
Download a video version of the 5 most effective hip exercises for runners. You’ll get full descriptions on how to perform and a video to help guide you.
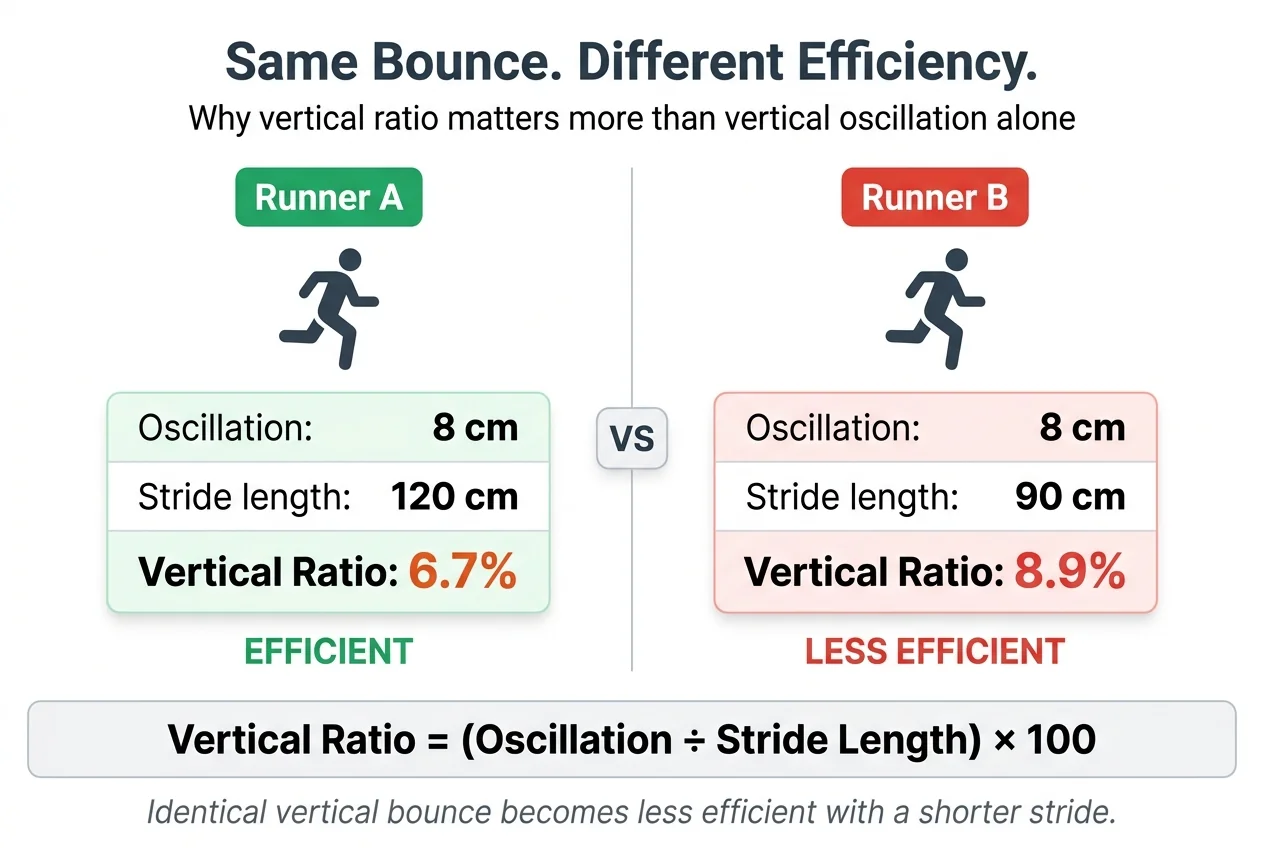
What Is Vertical Ratio, and How Is It Different from Vertical Oscillation?
Vertical ratio is a percentage that puts your vertical oscillation in the context of your stride length.
The formula is: vertical ratio = (vertical oscillation divided by stride length) multiplied by 100.
A runner with 8 cm of vertical oscillation and a 120 cm stride has a vertical ratio of 6.7%.
A runner with the same 8 cm of oscillation but a shorter 90 cm stride has a vertical ratio of 8.9%, which is less efficient despite identical bounce.
For most runners at moderate paces, a vertical ratio between 6% and 8% reflects efficient mechanics. The lower the number, the more of your energy is going forward rather than up.
Garmin devices display both metrics during and after runs, which is why you see two numbers that look related but measure different things.
Vertical oscillation alone doesn’t tell you whether your bounce is appropriate for your stride length.
Vertical ratio does, capturing whether your vertical movement is proportional to how much ground you’re covering per stride.
How Do You Measure Your Vertical Oscillation?
The most reliable consumer tools for measuring vertical oscillation are Garmin’s chest-worn sensors: the HRM-Pro, HRM-Run, and Running Dynamics Pod.
A 2022 study validated the Garmin HRM and Running Dynamics Pod against video motion capture, and both devices reliably tracked changes in vertical oscillation, though readings can differ by 1–2 cm between device models.
Chest strap placement matters: the sensor needs to sit flush against your sternum, not shifted to your side, for accurate readings.
If you don’t have a chest strap, video analysis is a free alternative.
Film yourself from directly behind with a camera at hip height, and watch how much your head bobs during 10 consecutive strides.
Excessive vertical bounce is visible without needing a measurement. Your head will rise and fall noticeably with each step instead of staying level.
Smartphone apps like RunScribe and Runmatic can estimate vertical oscillation, though accuracy varies more than with dedicated chest-worn wearables.
What Happens When Your Vertical Bounce Is Too High?
High vertical oscillation above 10 cm at most recreational paces means you’re spending energy going upward that could be driving you forward.
Research published in the International Journal of Sports Physical Therapy found that cueing runners toward a 10% reduction in vertical oscillation cut peak ground reaction forces more than a 10% increase in cadence — the same impact absorbed with every footstrike.
That impact load compounds over miles.
A runner logging 30 miles a week with consistently high vertical bounce absorbs measurably more cumulative joint stress than a runner at the same mileage with lower oscillation.
Runners with high vertical oscillation also tend to have longer ground contact time.
The energy spent accelerating upward delays the transition to the flight phase, which shortens the window for forward propulsion.
High oscillation is rarely intentional. It’s usually a symptom of inefficient push-off mechanics or excessive tension in the hips and legs.
What Happens When Your Vertical Bounce Is Too Low?
Low vertical oscillation below 5 cm typically signals a shuffling stride that isn’t generating enough force to fully enter the flight phase.
The brief moment when both feet are off the ground requires some vertical movement to exist.
Without it, your foot barely leaves the ground with each step, stride length shortens, and you’re taking more steps than necessary to cover the same distance.
A low vertical oscillation combined with high ground contact time usually points to weak push-off mechanics: the calf and posterior chain aren’t generating enough force at toe-off.
The fix is rarely about consciously trying to bounce higher.
Building calf strength, single-leg push-off drills, and plyometric work tend to correct the underlying power deficit, and the vertical oscillation number rises naturally as a result.
5 Ways to Lower Your Vertical Oscillation
Each of these adjustments targets a different mechanism that drives excessive vertical movement. Pick the one that matches what you’re seeing in your data.
Increase Your Running Cadence
Taking more steps per minute is one of the most effective ways to reduce vertical oscillation without consciously thinking about your bounce.
At lower cadences (say, under 160 steps per minute), each stride tends to be longer and the arc of movement higher, which pushes oscillation up.
Increasing running cadence to the 170–180 range shortens your stride slightly, which limits how far your body can travel upward between foot strikes.
A simple starting point: count your steps for 60 seconds on your next easy run.
If you’re under 160, aim to add 5% over 2–3 weeks before pushing higher.
Check Your Forward Lean
A slight forward lean from your ankles, not your waist, shifts the power vector forward instead of upward.
The lean should feel like you’re about to tip forward, then catch yourself with each stride.
Around 5–10 degrees from vertical is the target range for most recreational paces.
Leaning from the waist creates a hinge in your torso that typically generates more vertical bounce, not less.
The tilt needs to come from your entire body from the ankles up, staying tall and aligned through your hips and spine.
Push Off with the Balls of Your Feet
Landing and pushing off from the mid-foot generates more horizontal propulsion than heel-first contact at the same effort level.
Heel striking involves a braking action at footfall: the foot lands in front of your center of mass, the body briefly decelerates, then re-accelerates.
This deceleration-acceleration pattern creates a more pronounced vertical rise and fall with each stride.
A drill that reinforces the correct push-off: run 4–6 accelerations of 20–25 meters at moderate effort, focusing on feeling pressure build through the ball of your foot at toe-off.
Three to four sets of these per week during a warmup tends to build the muscle memory over 2–3 weeks.
Relax Your Leg Muscles
Tension in the quads and calves restricts the natural flexion and extension at the knee and ankle during each stride.
When those joints can’t move through their full range, your body compensates by extending upward rather than forward, which pushes oscillation higher.
If your legs feel rigid or braced during a run, slowing your pace and shaking out your arms for 20–30 seconds can reset the muscle tension enough to continue with better mechanics.
If you consistently tighten up after 10–15 minutes regardless of pace, that’s a signal to check your hip flexor mobility and calf flexibility before your next run.
Build Hip Extension and Ankle Mobility
Restricted hip extension forces compensation with more vertical movement.
When the hip can’t fully extend behind your body during push-off, forward power is lost and your body compensates by extending upward instead of backward.
The result is higher vertical oscillation even when no obvious tension is felt in the legs.
Hip flexor stretching after runs, single-leg ankle dorsiflexion drills, and glute activation exercises in your warmup can systematically reduce this compensation pattern over 4–6 weeks.
Making these changes stick takes time and progressive repetition, and our Improve Running Form course walks through the specific drills and strength work that actually rewire movement patterns over weeks, not just one session.
Your vertical oscillation number is a diagnostic tool.
For most runners, the biggest efficiency gains come from increasing cadence and improving push-off mechanics, because both changes reduce excessive bounce without requiring you to think about oscillation directly.
Check your number, compare it against the 6–9 cm target for your typical training pace, and then focus on the underlying form change that’s most likely driving it.
The number tends to follow.