

Shin splints are perhaps the most common injury for beginner runners.
Unfortunately, thanks to the constant spread of outdated information, most of the articles on how to get rid of shin splints are unhelpful.
Stop me if you’ve tried this – put ice on your shins, taken ibuprofen or tylenol for swelling, and grabbed the theraband to strengthen shin muscles.
I’m willing to bet that hasn’t worked.
Sure, the ice and ibuprofen probably helped reduce the pain.
But, the injury likely came back.
In this article, we’ll look at what causes shin splints, shin splint symptoms, and outline a specific shin muscle strengthen routine so you can know how to avoid shin splints in the future.
Why Do I Get Shin Splints When I Run?
 The “shins” are actually a group of muscles and bones that make up the front, lower part of your leg.
For runners, the most well-known muscle in shin area is called the tibialis anterior, which is responsible for dorsiflexing and inverting your foot.
However, the primary bone runners are concerned with is the tibia, although the fibula can present problems as well.
Now:
The role of the shin bone during running is to help absorb and dissipate the impact generated with each foot fall.
Much like a beam on a bridge or in a skyscraper bows slightly when it’s supporting a lot of weight, your tibia bends backwards slightly on impact with the ground, putting compressive forces on the medial side of the bone.
Here’s the deal:
In healthy runners, the stress a bone experiences after a long, hard run is not a problem.
The body responds to the stress on the bone by remodeling the tibia to be stronger and thicker.
This is why shin problems are more common in less experienced runners: their bone has not yet adapted to the stresses of a high-impact activity like running.
How to Strengthen Shins to Prevent Shin Splints
The outdated theory on preventing shin splints was that tightness or weakness of the shin muscles caused them to tug at their insertion point, irritating the periosteum, a thin, skin-like structure that envelopes the tibia itself.
This is why you may read about doing shin strengthening exercises with a theraband as a common treatment for shin splints.
Unfortunately:
Because weak shin muscles (tibias anterioris) are not the real cause of shin splints, strengthening the tibilias anterior will only help prevent shin splints slightly. (Mostly because it’s such a small muscle and its primary function is dorsiflexion of the ankle, not shock absorption.)
How do you prevent shin splints?
In reality, improving calf strength, abductor strength and strengthening hip muscles are a better approach to preventing shin splints.
The calves are the largest muscle group in the lower leg (more on them here) and research has shown that strengthening them will help you stabilize the tibia with each impact.
This is interesting:
The size of your calves is directly related to the size and strength of your tibia since the tibia “grows” in response to the muscles around it.
It get’s better:
Likewise, several studies have demonstrated a strong connection between hip abductor strength and shin splints.
Specifically, studies have shown that runners with shin splints had significantly worse hip abduction strength and had significantly more motion in their torso and hips when they landed and pushed off compared to healthy runners.
What’s the bottom line?
Therefore, the most effective strengthening exercises for strengthening your shins and preventing shin splints are going to be calf raises and hip abductor strengthening exercises.
How to Prevent Shin Splints Routine
So now that we know all this new information about the cause of shin splints, how can you develop a routine to prevent them?
Below is a sample of four exercises from our Strength Training for Runners program, which also includes injury prevention routines based on scientific research for 8 of the most common running injuries.
These four exercises are designed to target the abductors and the calves. Of course, we have plenty of additional exercises to choose from, but this should help you get started right away.
RunnersConnect Insider Bonus
Download our Shin Splint Prevention Guide inside your Insider Members area.
It’s a PDF with the four best exercises to help you prevent shin splints.
Clams


Instructions:
Keep the pelvis perpendicular to the floor rather than rolling backwards, which is a way to cheat this exercise.
Work up to 20 repetitions and for additional difficulty, wrap a theraband around your knees.
It is not OK to substitute this exercise for the multi hip machine at the gym!
Donkey kicks
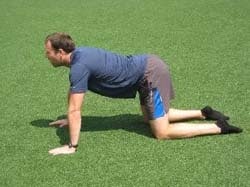
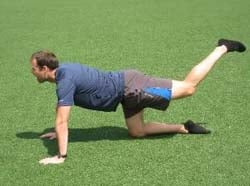
Instructions:
Keep your abs tight and your back flat.
Imagine placing a broomstick on your back and keeping it in place throughout the entire movement.
Perform 15-25 repetitions per leg.
Hip thrusts
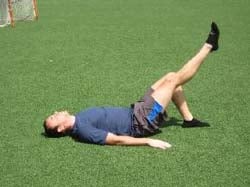
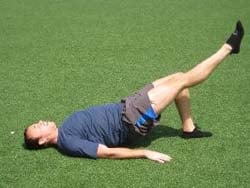
Instructions:
At the top of the movement your body should be in a straight line from your knee to your head.
Beginners can thrust on both legs while advanced runners can rest their foot on a medicine ball or swiss ball for added difficulty in balance.
Perform 15-25 repetitions each leg.
Eccentric Calf raises
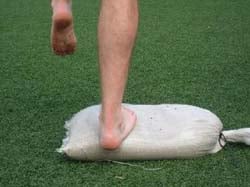
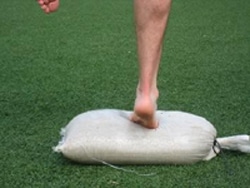
Instructions:
Slowly lower yourself down from a step with one leg and use the other leg to raise yourself back into tip-toe position.
Perform up to 25 of these exercises and add a weight with a backpack once they become easy.
If you’re currently experiencing shin splints or they have plagued you in the past, incorporate this routine into your training two to three times per week.
Now you’ll be targeting the real cause of your shin pain rather than strengthening a muscle that really doesn’t contribute to the injury.
And if you are wondering:
Can shin splints cause ankle pain?
Possibly, but if you have ankle pain, this article on ankle injuries might have some more helpful information for you to figure out what is going on.
Cross Training While Injured and During Recovery
Aqua jogging is a form of deep water running that closely mimics the actual running movement. Your feet don’t actually touch the bottom of the pool, so it is zero impact and safe for almost any type of injury. In my experience, the only time to avoid aqua jogging is when you have a hip flexor injury, which can be aggravated by the increased resistance of the water as you bring your leg up. Because aqua jogging closely mimics natural running form, it provides a neuromuscular workout that, in addition to aerobic benefits, helps keep the running specific muscles active. The same can’t be said for biking and swimming. The only downside to aqua jogging is that you need a pool that is deep enough to run in without touching the bottom. If you’re lucky enough to have access to a pool of this size, aqua jogging should be your first cross training choice.Aqua Jogging Workouts For Runners
If you're interested in aqua jogging to rehab your injury, then the absolute best way is to use one of my favorite programs, Fluid Running.
Medium Effort Workouts
Hard Workouts


7 Responses
Just got shin splints while learning to run. This site helps. Thanks.
Has anyone tried the king brand or mendmeshop products for shin splints? I’m currently taping them before I go for a run but I’m still in pain. Someone in my running club recommended king brand but I wanted to see if anyone here could give me some advice. Haven’t tried the stretches yet but I’ll consider it. Thanks. Here is the stuff my friend told me about.
Find a physical therapist that does a Graston release. You can do it on your own after a few sessions. It will break up the scar tissue from shin splints. The exercises above are great, but if you have suffered for a while, you have scar tissue that needs to be addressed before you will recover fully.
Can’t say enough about tape when it comes to shin splints…seriously. The difference is huge!
The above exercises are the exact same introductory exercises for shin splints my physio prescribed.
Form is imperative.
Later on a theraband is used to increase resistance.
Agreed! Thanks for sharing your thoughts!
This article explains so much! I have has shin splints for over 15 years and they are gone! I have been doing barre which definitely strengthens your calf muscles and hip abductors. Now completely pain free from shin splints! My flexibility has improved so much and my body feels amazing! I am living proof of this article.