

Your running shoe has a seventh eyelet at the top that most runners ignore.
That extra hole is there for one reason: heel lock lacing.
Used correctly, the heel lock (sometimes called the runner’s knot or ankle lock) pulls your heel deeper into the shoe, reduces the amount your foot slides on impact, and lowers the load forces that contribute to stress injuries.
Three biomechanics studies have tested it directly. All three reach the same conclusion: it works, and it changes how a shoe feels on your foot within the first mile.
Here’s what you’ll learn:
- What heel lock lacing actually is and why that top eyelet exists
- What the research found when runners tested it against standard lacing
- Step-by-step instructions for tying the heel lock knot
- When to use the skip-sixth-eyelet variant instead
- Whether ladder lacing is worth trying
What Is Heel Lock Lacing?
Heel lock lacing is a lacing technique that uses the uppermost eyelet of a running shoe to create a loop on each side, then ties those loops together to lock the heel against the shoe’s collar.
Standard cross-lacing pulls the shoe snug across the top of the foot, but the heel can still shift slightly with each stride.
The heel lock eliminates that shift by anchoring the ankle within the shoe before the knot is tied.
You’ll see it called by several names depending on where you look: runner’s knot, ankle lock lacing, and lock lacing all describe the same technique using the top seventh eyelet.
A 2009 study testing 20 runners across 6 lacing conditions found that 7-eyelet heel lock lacing produced the lowest peak heel pressures of any condition tested and significantly reduced tibial loading rates compared to standard six-eyelet cross-lacing, with no difference in perceived comfort.

That second part matters.
Runners often assume the heel lock will feel tighter or more restrictive than standard lacing.
The biomechanics evidence shows the perception of comfort is the same.
Does Heel Lock Lacing Actually Work?
Biomechanics researcher Marco Hagen at the University of Duisburg-Essen spent several years testing exactly this question.
In his first study, 20 experienced rearfoot runners ran through 6 different lacing conditions while researchers measured impact loading rates, pronation velocity, and plantar pressure distribution under the foot.
The 7-eyelet heel lock produced the lowest peak pressures under the heel and lateral midfoot of any lacing condition tested.
Hagen’s follow-up study added a second measurement: pressure on the top of the foot.
Tightening standard laces to get the same stability as the heel lock increased pressure over the navicular bone and extensor tendons, structures that can develop overuse injuries from prolonged pressure.
The heel lock matched the stability of tight standard lacing without raising that dorsal pressure.
A 2025 study from the University of Valencia added a thermal angle to the data.
A 2025 study in Applied Ergonomics found that cross-lacing produced higher post-run foot skin temperature than heel lock lacing, and that increased temperature was directly associated with discomfort during running.
Cross-lacing holds heat differently against the top of the foot.
Heel lock lacing allowed for better thermoregulation.
Runners in the heel lock condition reported higher comfort scores across the 20-minute treadmill trial.
Heel lock lacing reduces impact load on the lower leg, improves heel stability, and leaves the foot cooler and more comfortable during longer runs.
You can read more about how foot strike pattern interacts with impact forces if you want the broader biomechanics picture.
How Do You Tie the Heel Lock Knot?
You need a shoe with a seventh eyelet at the top: the small loop hole slightly above and offset from the main eyelet column.
If your shoe has 6 eyelets per side but no seventh, standard cross-lacing with a firm knot is your best option.
For shoes with a seventh eyelet, follow these steps:
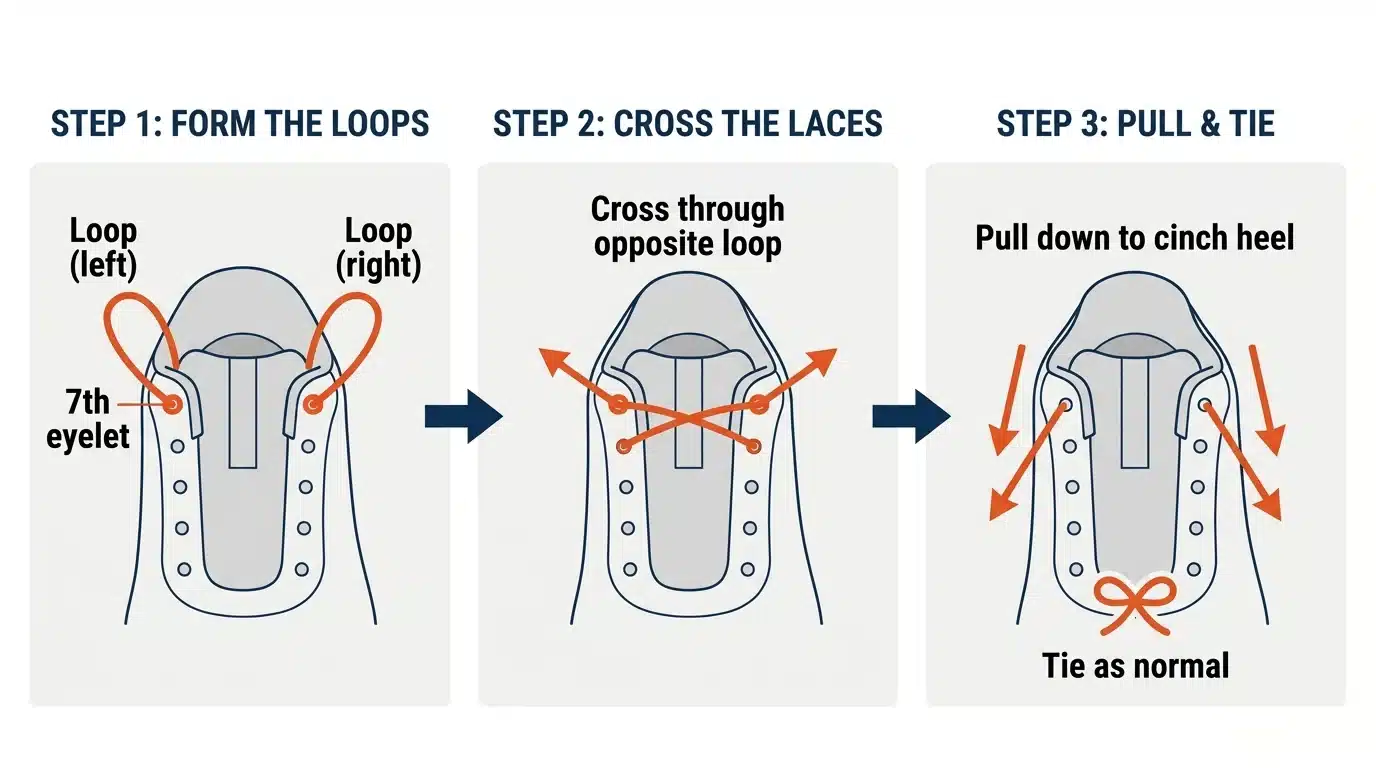
- Lace through the bottom six eyelets normally. Use your standard cross-lacing pattern up through the sixth eyelet on each side.
- Thread the lace up into the seventh eyelet on the same side. Do not cross to the opposite side yet. Pull the lace through so it forms a small loop on the outside of the shoe.
- Repeat on the other side. You now have a loop on each side of the shoe at ankle height.
- Cross the laces through the opposite loop. Thread the left lace through the right loop. Thread the right lace through the left loop.
- Pull both laces down and outward to tighten. This cinches the heel collar against your ankle. You should feel the heel seat firmly against the back of the shoe.
- Tie your standard knot as usual. The heel lock holds independently of the knot.
Pull the loops snug but not tight enough to feel pressure on your ankle bones. The goal is to eliminate heel slip, not to restrict blood flow.
The first time you try the heel lock, it may feel unfamiliar around the ankle for the first few minutes of a run.
That feeling fades quickly. What you gain is a shoe that no longer shifts on the heel during push-off.
Should You Skip the 6th Eyelet?
Hagen’s 2010 study tested a modified heel lock variant: skip the sixth eyelet entirely, thread directly from the fifth into the seventh to form the loop.
That small change produced a measurable reduction in pressure over the talus and navicular bone.
The talus and navicular are the high-arch bones at the top of the foot just above the tongue.
The 2010 follow-up study found that the skip-sixth-eyelet variant reduced peak dorsal pressure over the navicular and tarsus more than any other lacing pattern tested, while maintaining the same heel stability as standard 7-eyelet lacing.
If you experience any of the following, the skip-sixth variant is worth trying:
- Pain or discomfort across the top of the foot during longer runs
- Numbness over the midfoot, especially when lacing feels tight
- A prominent navicular bone or high instep that presses against the shoe tongue
- A history of extensor tendonitis
The technique is identical to the standard heel lock. Skip the sixth eyelet and go directly to the seventh when forming the loop on each side.
For runners without dorsal pressure issues, the standard 7-eyelet heel lock and the skip-sixth variant perform equally well on stability.
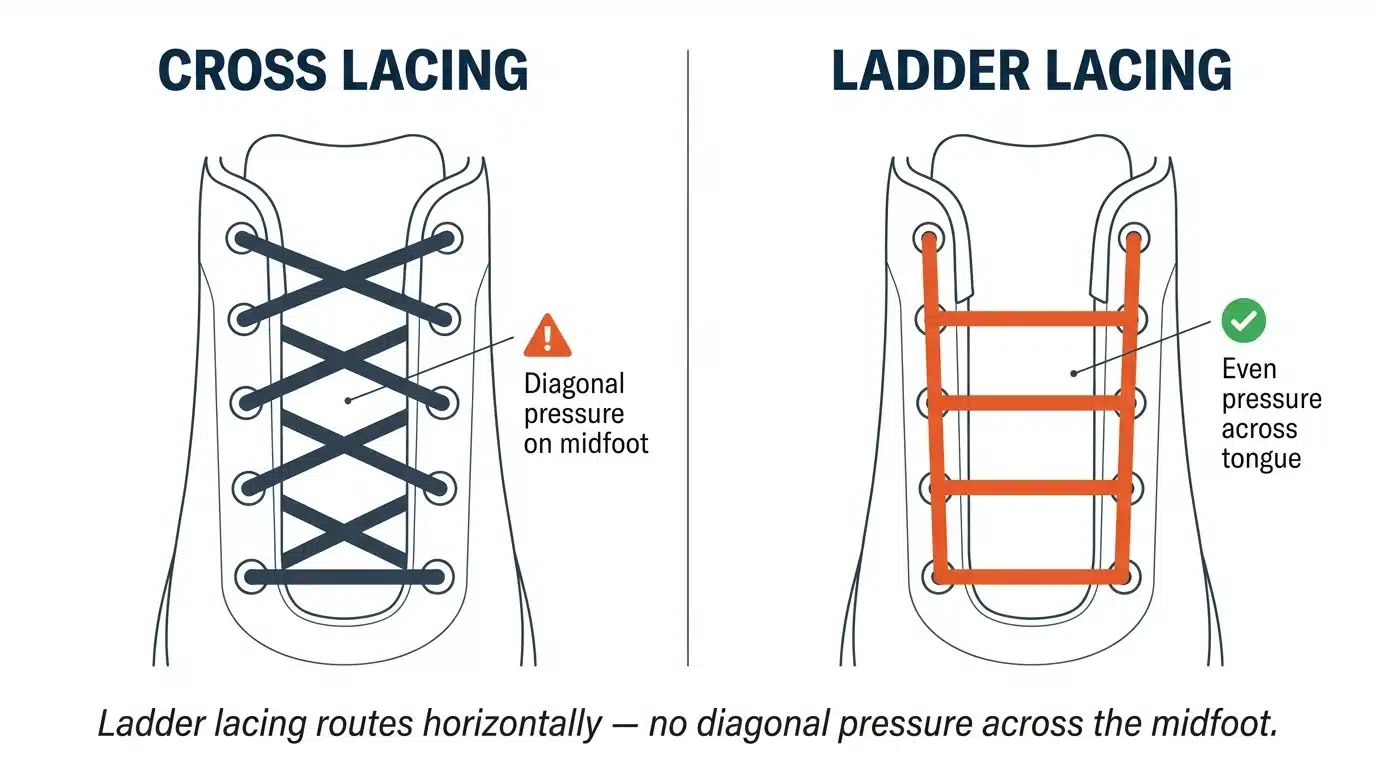
When Does Ladder Lacing Make Sense?
Ladder lacing (also called Lydiard lacing, after coach Arthur Lydiard who promoted it in the 1960s and 70s) routes the laces in parallel horizontal rungs rather than crossing diagonally over the top of the foot.
The laces never cross the metatarsals, which removes the diagonal pressure point that standard cross-lacing creates across the midfoot.
There is limited biomechanics research on ladder lacing specifically. Hagen noted this gap in his own papers.
Based on the mechanism, ladder lacing is worth trying if:
- You have recurring pain or blisters on the top of the midfoot that aren’t resolved by the skip-sixth variant
- You have wide feet where the diagonal lace pressure is concentrated over a broad area
- You need maximum pressure distribution across the tongue rather than a stability focus
Ladder lacing trades some heel stability for top-of-foot pressure relief.
Runners who need both can pair a ladder base with a heel lock finish: use ladder lacing from the toe up through the fifth or sixth eyelet, then transition to heel lock loops at the seventh.
Which Lacing Pattern Should You Use?
The answer depends on what problem you’re solving.
| If you have this problem | Try this lacing |
|---|---|
| Heel slipping during push-off | Standard heel lock (7-eyelet) |
| Pain on top of foot from tight lacing | Skip-sixth-eyelet heel lock |
| Numbness or pressure across the midfoot | Ladder lacing (or skip-sixth) |
| Black toenails or toe box pressure | Skip first or second eyelet; widen toe box |
| No specific problem | Standard heel lock (research supports it as a default) |
RunnersConnect Bonus
Download your FREE lacing techniques guide.
You know how to read the wear of shoes, but are you lacing your shoes wrong? Download our Running Shoe Lacing guide for free and get a quick reminder, specific how-to and resources for videos on the best way to lace your running shoes.
The research makes the clearest case for the standard heel lock as a default for most runners.
It reduces impact load, stabilizes the heel, and doesn’t require any discomfort tradeoff to do it.
The shoe lacing you use affects every stride you take on a run.
Spending two extra minutes tying the heel lock knot before a training cycle costs nothing and removes one variable that drives repetitive stress injuries over time.
Your arch height and foot type also affect how your shoe fits and performs. If you’re dealing with recurring pain that lacing changes don’t fully resolve, arch height and foot type is worth reading next.


14 Responses
I would recommend visiting a running store and having an employee look at your feet to give you a good idea of what category your feet fit in. If you have serious foot complications like extreme pronation, fallen arches, etc I would recommend visiting a foot doctor, as running shoes by themselves might not be enough. You could require orthotics, or even just simple strengthening exercises to get and keep you on your feet.-
Is it just my perception or are the different lacing photos actually the same? I want to see the special heel lock lacing that skips the 6th, but think it’s not shown. Thanks.
Thanks for the heads up. Image fixed!
I have switched to a ladder lacing with a heel lock in the final eyelets and love it! I have always used the heel lock but before i started using the ladder lacing I was always have heel and arch pain that mimicked PF but never exhibited the classic PF symptoms (pain the morning, after sitting, etc). Since switching to ladder lacing that has completely disappeared. I have also noticed that my lower legs are not nearly as fatigued after my long runs since switching. One caveat to ladder lacing that I have noticed though is that my laces tend to come un-tied more easily. Not sure why. I just have to double knot.
I just read your comment and it sounds like my problem. After longer runs my arch and my heel hurt. They said it seems like PF, but I don’t have the other symptoms. Can you tell me where you got the information on how to do the ladder lacing with the heel lock? I am training for my first half marathon and I’m doing a long run (long for me) tomorrow and I’d like to try it.
Thank you!
Hi Sari, not sure what you are looking for with the lacing. Is there a reason you cannot try your laces the way we recommended in the post? Just want to get an idea for what you are looking for 🙂
I have severe PF, limited my exercise down to walking 3 miles a day. I am out of options. I wear Brooks and have custom orthotics. No relief. I notice my shoes are lose, should I use the ladder method and tighten them tight? Any suggestions would be appreciated. Mri today confirmed acute PF with swollen kager fat pad and lateral metatarsal swelling with fluid, from inflation.
Hi Shelley, sorry to hear about your PF. Have you read our article on how to recover from it? https://runnersconnect.net/running-injury-prevention/plantar-fasciitis-in-runners/ This should provide you lots of different ways of attacking it to get back on track. Would probably best to take some time off if your doctor recommended it based on your MRI findings. Unfortunately this is all we can recommend for now! Hope it heals up quickly.
Interesting study. I’m a runner and also a basketball player. I stumbled on this article while trying to find a heel lock system for some new Adidas basketball shoes I bought online. I haven’t bought Adidas in forever because I always experience heel slippage. The new pair is, unfortunately, no different. (I thought I’d give Adidas another shot after 12 years because the price was right) The heel lock system described in this article totally works though. I’m a bit amazed at how well it works actually and am now going to try it on some New Balance trail runners I recently picked up for the fall/winter runs. Thanks again for the article.
Hi Jeffrey, thanks for reaching out and sharing your feedback. We are glad to hear that it works for you, and we hope you continue to use us as a source for your running related questions! Best of luck with your future!
Hi, great article, I have the Pegasus 31’s, which eyelet is considered the 6th?
Hi Greg, it would be the hole that is furthest away from your toes, they do not usually fall on a line with the rest, but slightly closer to your ankle. Hope this helps!
Nice blog. Thank you for your valuable information.
The blog and the post are absolutely fantastic! A lot of information is helpful in some way. Keep updating the blog, looking forward to more content …Great job, keep it up.
Thank you very much, David!